27 Eylül 2020 Pazar

Kali Desktop Environments Installation and Removal

 ----

## XFCE Desktop ##
----
### How to install XFCE Desktop Environment in Kali Linux:
Command:

```apt-get install kali-defaults kali-root-login desktop-base xfce4 xfce4-places-plugin xfce4-goodies```

### How to remove XFCE in Kali Linux:
Command:

```
 apt-get remove xfce4 xfce4-places-plugin xfce4-goodies
```
----
## KDE Desktop ##
----
### How to install KDE Plasma Desktop Environment in Kali Linux:
Command:

```
 apt-get install kali-defaults kali-root-login desktop-base kde-plasma-desktop
```
### How to install Standard Debian selected packages and frameworks in Kali Linux:
Command:
```
 apt-get install kali-defaults kali-root-login desktop-base kde-standard
```
### How to install KDE Full Install in Kali Linux:
Command:
```
 apt-get install kali-defaults kali-root-login desktop-base kde-full
```
### How to remove KDE on Kali Linux:
Command:
```
 apt-get remove kde-plasma-desktop kde-standard
```
----
## LXDE Desktop ##
----
#### How to install LXDE Desktop Environment in Kali Linux:
Command:
```
 apt-get install lxde-core lxde kali-defaults kali-root-login desktop-base
```
#### How to remove LXDE on Kali Linux:
Command:
```
 apt-get remove lxde-core lxde
```
----
## GNOME Desktop ##
----
#### How to install GNOME on Kali Linux:
Command:
```
 apt-get install gnome-core kali-defaults kali-root-login desktop-base
```
#### How to remove GNOME on Kali Linux:
Command:
```
 apt-get remove gnome-core
```
----
## Cinnamon Desktop ##
----
#### How to install Cinnamon Desktop Environment in Kali Linux:
Command:
```
 apt-get install kali-defaults kali-root-login desktop-base cinnamon
```
#### How to remove Cinnamon Desktop Environment in Kali Linux:
Command:
```
 apt-get remove cinnamon
```
----
## MATE Desktop ##
----
#### How to install MATE Desktop Environment in Kali Linux:
#### This installs the base packages
Command:
```
 apt-get install kali-defaults kali-root-login desktop-base mate-core
```
#### Or this to install mate-core and more extras
Command:
```
 apt-get install kali-defaults kali-root-login desktop-base mate-desktop-environment
```
#### Or this to install mate-core + mate-desktop-environment and even more extras.
Command:
```
 apt-get install kali-defaults kali-root-login desktop-base mate-desktop-environment-extra
```
#### How to remove MATE Desktop Environment in Kali Linux:
Command:
```
 apt-get remove mate-core
```
Now the only problem is MATE doesn't show the nice Kali Linux Menu. Fix posted by Silver Moon

To fix this edit the following file.
Command:
```
 leafpad /etc/xdg/menus/mate-applications.menu
```
In the file go down to the section named Internet and add the following line
HTML Code:
```
<!-- Kali Linux Menu -->
<MergeFile type="path">applications-merged/kali-applications.menu</MergeFile>
```
So it should look something like this
HTML Code:

```
 <!-- Internet -->
  <Menu>
    <Name>Internet</Name>
    <Directory>mate-network.directory</Directory>
    <Include>
      <And>
        <Category>Network</Category>
      </And>
    </Include>
  </Menu>   <!-- End Internet -->
<!-- Kali Linux  -->    
  <MergeFile type="path">applications-merged/kali-applications.menu</MergeFile>
```

18 Temmuz 2020 Cumartesi

How to install Google Chrome Browser on Kali Linux

Objective

The objective is to install Google Chrome web browser on Kali Linux. See an appendix for a possible issue troubleshooting.

Requirements

Privileged access to your Kali Linux installation or Live system is required.

Difficulty

EASY

Conventions

  • # - requires given linux commands to be executed with root privileges either directly as a root user or by use of sudo command
  • $ - requires given linux commands to be executed as a regular non-privileged user

Instructions

Download Google Chrome

To start, use wget command to download a latest Google Chrome debian package:
# wget https://dl.google.com/linux/direct/google-chrome-stable_current_amd64.deb

Install Google Chrome


The easiest way to install google chrome on you Kali Linux is to by use of gdebi which will automatically download all depended packages. First, install gdebi:
# apt install gdebi-core
Once ready, install the actual google chrome package:
# gdebi google-chrome-stable_current_amd64.deb

Start Google Chrome

To start Google Chrome, open up a terminal and run google-chrome command:
$ google-chrome --no-sandbox

Appendix

No sandbox

ERROR:zygote_host_impl_linux.cc(89)] Running as root without --no-sandbox is not supported.
To avoid this error simply start the Google Chrome browser by using a --no-sandbox switch:
# google-chrome --no-sandbox

Illegal Instruction

The Illegal Instruction error message appears when running the google-chrome command as privileged root user. Since by default Kali Linux's default user is root, we need to create a dummy non-privileged user eg. linuxconfig, and use this user to start Google Chrome browser:
# useradd -m -d /home/linuxconfig linuxconfig
# su linuxconfig -c google-chrome

Package libappindicator1 is not installed

dpkg: dependency problems prevent configuration of google-chrome-stable:
 google-chrome-stable depends on libappindicator1; however:
  Package libappindicator1 is not installed.
To resolve Google Chrome's dependencies problems use gdebi to install Google Chrome's debian package. See above.

13 Kasım 2019 Çarşamba

Ahıska Türklerinin sürgün edilişinin 73. yıldönümü

Ahıska Türkleri, 1944’te Sovyet lideri Stalin tarafından kapalı yük trenleri içinde vatanlarından Orta Asya’ya sürgüne yollanmış bir topluluktur. Stalin liderliğindeki Sovyetler Birliği, 14 Kasım 1944'te Gürcistan’ın Ahıska bölgesinde yaşayan on binlerce Ahıskalı Türk’ü ''sınır güvenliğini tehdit ettikleri'' gerekçesiyle sürgün etmiştir. Bugün bu Türklerin tarif edilmez acılar çektiği, yerlerinden sürüldüğü, açlıkla ve ölümle imtihanının 73. yıldönümü.

7 Temmuz 2019 Pazar

11 Firefox Add-ons a Hacker Must Have

11 Firefox Add-ons a Hacker Must Have 1. Tamper Data Tamper data is a great tool to view and modify HTTP/HTTPS headers and post parameters. We can alter each request going from our machine to the destination host with this. It helps in security testing web applications by modifying POST parameters. It can be used in performing XSS and SQL Injection attacks by modifying header data. Add Tamper data to Firefox: https://addons.mozilla.org/en-us/firefox/addon/tamper-data/ 2. Firebug Firebug is a nice add-on that integrates a web development tool inside the browser. With this tool, you can edit and debug HTML, CSS, and JavaScript live on any webpage to see the effect of changes. It helps while analyzing JS files to find XSS vulnerabilities. It’s a very helpful add-on for finding DOM based XSS for security testing professionals. Add Firebug to your browser: https://addons.mozilla.org/en-US/firefox/addon/firebug/ 3. Hackbar Hackbar is a simple penetration tool for Firefox. It helps in testing simple SQL injection and XSS holes. You cannot execute standard exploits but you can easily use it to test whether or not vulnerability exists. You can also manually submit form data with GET or POST requests. It also has encryption and encoding tools. Most of the time, this tool helps while testing XSS vulnerability with encoded XSS payloads. It also supports keyboard shortcuts to perform various tasks. I am sure most people in the security field already know about this tool. Hackbar is mostly used in finding POST XSS vulnerabilities because it can send POST data manually to any page you like. With the ability to manually send POST form data, you can easily bypass client side validations. If your payload is being encoded at client side, you can use an encoding tool to encode your payload and then perform the attack. If the application is vulnerable to XSS, I am sure you will find the vulnerability with the help of the Hackbar add-on to Firefox browser. Add Hackbar to Firefox: https://addons.mozilla.org/en-US/firefox/addon/hackbar/ 4. Cookies Manager Cookie Manager is one of the greatest tools ever created. Using this tool you can actually play with cookies. You can alter almost every cookie using this tool. You can use Cookies Manager to view, edit, and create new cookies. It also displays extra information about cookies, allowing you to edit multiple cookies at once and backup/restore them. Add Cookies Manager to Firefox: https://addons.mozilla.org/en-US/firefox/addon/cookies-manager-plus/ 5. NoScript No Script add-on is greatness beyond imagination. With this tool, you can monitor each and every script running on a website; you can block any of the scripts and see what each script actually does. But this add-on is for experts, newbies will face problems using this. Note: If you are testing XSS, HTTPS header modifications, or Injection attacks on any website, you need to disable this plugin first because it will block your efforts. Add NoScript to Firefox: https://addons.mozilla.org/en-us/firefox/addon/noscript/ 6. Grease Monkey Grease Monkey is the counter part to NoScript, its function is the exact opposite of Noscript. We use Noscript to block scripts and GreaseMonkey to run them. It allows you to customize the way a web page displays or behaves by using small bits of JavaScript. Add Grease Monkey to Firefox: https://addons.mozilla.org/en-US/firefox/addon/greasemonkey/ 7. User Agent Switcher User Agent Switcher adds a one-click user agent switch to the browser, along with a menu and tool bar button. Whenever you want to switch the user agent, use the browser button. User Agent add-on helps in spoofing the browser while performing an attack. Add User Agent Switcher to Firefox: https://addons.mozilla.org/en-US/firefox/addon/user-agent-switcher/ 8. CryptoFox CryptoFox is an encryption or decryption tool for Mozilla Firefox. It supports most of the available encryption algorithms so you can easily encrypt or decrypt data with supported encryption algorithms. This add-on comes with dictionary attack support to crack MD5 cracking passwords. Although it hasn’t always had great reviews, it works satisfactorily. Add CryptoFox to Firefox: https://addons.mozilla.org/en-US/firefox/addon/cryptofox/ 9. SQL Inject Me SQL Inject Me is another nice Firefox add-on used to find SQL injection vulnerabilities in web applications. This tool does not exploit vulnerabilities but displays their existence. SQL injection is one of the most harmful web application vulnerabilities, it can allow attackers to view, modify, edit, add, or delete records in a database. This tool sends escape strings through form fields and searches database error messages. If it finds a database error message, it marks the page as vulnerable. Hackers can use this tool for SQL injection testing. Add SQL Inject Me to Firefox: https://addons.mozilla.org/en-us/firefox/addon/sql-inject-me/ 10. XSS ME Cross Site Scripting is the most common web application vulnerability. This add-on is incredibly useful for detecting XSS vulnerabilities in web applications. XSS-Me is used to find reflected XSS vulnerabilities from a browser. It scans all forms of the page, and then performs an attack on selected pages with pre-defined XSS payloads. After the scan is complete, it lists all the pages that rendered a payload, and may be vulnerable to XSS attack. Then, you can manually test the web page to determine whether or not the vulnerability exists. Add XSS ME to Firefox: https://addons.mozilla.org/en-us/firefox/addon/xss-me/ 11. Passive Recon Last but not the least, Passive Recon is an information gathering tool. Passive Recon provides information security professionals the ability to perform “packetless” discoveries of target resources utilizing publicly available information. It gathers information in the same manner as DnsStuff tool, available on backtrack. Add PassiveRecon to Firefox: https://addons.mozilla.org/en-US/firefox/addon/passiverecon/ That’s all for today. I hope you’re enjoying your journey towards becoming a Professional Hacker. Have fun! Keep learning.

29 Ocak 2019 Salı

Website Information Gathering with Red Hawk on Kali.

Welcome back hackers and pentesters to a tutorial on an all in one information gathering, and vulnerability analysis with a linux tool called Red Hawk. Recon and mapping out our target is a key step before we begin to hack or exploit anything. This tool helps automate this by seeing what our targeted site is running and if there are any exploits for it. Lets install it from our terminal and change to its directory, and then run it: git clone github.com/Tuhinshubhra/RED_HAWK Then change to red hawk directory: cd RED_HAWK Now lets run it: php rhawk.php
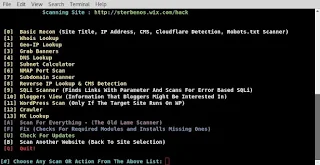
Now enter your website and hit enter. Then specify between whether it uses http or https. We now have options of what we would like red hawk to search for. we are going to go with option one. As mapping out our target site is one of the first steps in pentesting, using red hawk can easily help speed up this process by having these tools in one place.
As you can see red hawk has scanned our target site. From these we learned the target site does not use cloudflare ddos protection, runs Pepyaka version 1.13.10 ect. This is all useful information for mapping out target and from there trying to find ways we can attack. To use it agin just enter php rhawk.php from the same terminal. if you closed it change directories to RED_HAWK/ agin. Thats all for today folks, get to scanning !